
First of all, part of the reason these are THE BEST, is because they are SO EASY TO MAKE. ....And that is very important to me!My family devours these buttery little knots every single time I bake them (even my little picky eater who is 3) which is compliments in itself. They're perfect to whip up when you're having a big salad or Italian dinner and you want something "fancier" than just a baguette or rolls. I use a ton of fresh garlic, and parsley- but you could substitute any/all fresh herbs and be happy with the results. The dough is super forgiving, which I love because our budding foodie in the family, who is 9 and still learning his ways in the kitchen can help make them and we can always adjust the consistency of the dough if need be to make it just right.

Proofing is important, but also very flexible in case you need to speed things up OR if you want to save the dough in the refrigerator for baking another day. I would say the minimum amount of time for these would be 2 and a half hours, including baking and the max that the dough could be saved in the fridge is up to 3 days. Here is the recipe and please let me know when you try it! Post pictures and feedback below, or on Facebook/Instagram #saltsandseasons
Total Time: 2+ hours
Total Yield: about 18 knots
Ingredients:
2 Cups of All Purpose Flour
1 Packet of Instant Rapid Yeast
2 Tbsp. Sugar
2/3 Cup Water (Warm to about 110 degree)
2 Tbsp. Milk
2 tsp. Baking Powder
1 tsp Salt
6 Tbsp Butter
4-5 Cloves of Garlic; minced
Small Handful of Fresh Parsley; chopped
Salt & Pepper
Parmesan Cheese to top
*Extra butter or olive oil for greasing muffin tin
In the bowl of your stand mixer, add the yeast, sugar and warm water. Set timer for 10 minutes and do not disturb while the yeast activates.
After 10 minutes, the ingredients should look foamy and ready for the next steps.
Add the Flour, Milk, Baking Powder and Salt. With the Dough Hook, mix on low-medium speed until all incorporated. Your dough should bind together and leave the sides of the bowl clean. If this is not the case, you can adjust by adding 1 tsp of flour at a time if it is too sticky, or vice versa; 1 tsp of water if it looks too dry.
Mix the dough for 5-8 minutes until you get a springy, smooth, well mixed ball that comes off the hook easily and when you push it with your finger, it does not stick and bounces back a little.
Cover the bowl with plastic wrap and set aside in a warm spot (I usually leave on top the stove or on the counter nearby).
Proof the dough for minimum 1.5 hrs. but can leave for up to 3-4 hours until baking.
This is the time to put your dough into the refrigerator if you plan to save it for future use. It will expand so be mindful of what container you store it in.
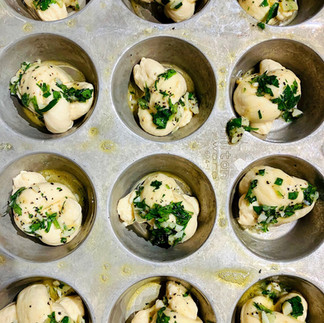
Once the dough has had enough time to double in size, you'll want to form the knots by pinching a small, golf ball sized pieces off of the ball and gently rolling it on your surface as little as possible to make it long enough to wrap around your finger into a knot. ** Careful to not overwork the dough as you complete this step because if you do, the gluten will begin to seize and tighten up.
Place your knots into a well greased muffin tin, I usually use butter or olive oil. Let them proof again for about 10-15 minutes while you assemble the garlic butter and preheat your oven.
Set oven to 350 degrees.
In a small saucepan or microwave safe bowl, melt the butter. Then, add all of your fresh garlic, parsley or herbs and seasoning.
Brush the knots all over with the delicious butter and bake for about 15 minutes or until they are golden brown.
You can finish them with more melted butter, if desired and of course- Parmesan Cheese! Best if served warm, immediately after baking.


Comments